使用include重用UI組件
當我們的佈局有一些重複的UI元素, 我們可以使用<include>來節省我們的工作. 亦可以使用<include>, 在不同的活動(Activity)中使用相同的UI組件.
使用include重用UI組件
當我們的佈局有一些重複的UI元素, 我們可以使用<include>來節省我們的工作. 亦可以使用<include>, 在不同的活動(Activity)中使用相同的UI組件.

先創建重用的UI佈局文檔, sublayout.xml
在我們的主佈局文件包括<include>兩個重用的UI佈局.
main.xml
在程序代碼中, 使用下面的方法來訪問個別元素:
View subLayout1 = (View)findViewById(R.id.main1);
Button myButton_main1 = (Button)subLayout1.findViewById(R.id.mybutton);
AndroidIncludeLayout.java
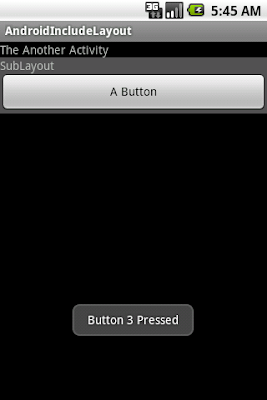
同樣, 在另一個佈局亦可以重複使用相同的元素.

anotherlayout.xml
AnotherActivity.java
記得, 如果你想運行此應用程序, 需要修改AndroidManifest.xml添加AnotherActivity活動(Activity).

先創建重用的UI佈局文檔, sublayout.xml
1
2
3
4
5
6
7
8
9
10
11
12
13
14
15
16
17
18
19
20
| <?xml version="1.0" encoding="utf-8"?> android:orientation="vertical" android:layout_width="fill_parent" android:layout_height="wrap_content" android:background="#505050" ><TextView android:layout_width="fill_parent" android:layout_height="wrap_content" android:text="SubLayout" /><Button android:id="@+id/mybutton" android:layout_width="fill_parent" android:layout_height="wrap_content" android:text=" A Button " /></LinearLayout> |
在我們的主佈局文件包括<include>兩個重用的UI佈局.
main.xml
1
2
3
4
5
6
7
8
9
10
11
12
13
14
15
16
17
18
19
20
21
| <?xml version="1.0" encoding="utf-8"?> android:orientation="vertical" android:layout_width="fill_parent" android:layout_height="fill_parent" ><TextView android:layout_width="fill_parent" android:layout_height="wrap_content" android:text="@string/hello" /><include android:id="@+id/main1" layout="@layout/sublayout" /><include android:id="@+id/main2" layout="@layout/sublayout" /><Button android:id="@+id/startanotheractivity" android:layout_width="wrap_content" android:layout_height="wrap_content" android:text=" Start Another Activity " /></LinearLayout> |
在程序代碼中, 使用下面的方法來訪問個別元素:
View subLayout1 = (View)findViewById(R.id.main1);
Button myButton_main1 = (Button)subLayout1.findViewById(R.id.mybutton);
AndroidIncludeLayout.java
1
2
3
4
5
6
7
8
9
10
11
12
13
14
15
16
17
18
19
20
21
22
23
24
25
26
27
28
29
30
31
32
33
34
35
36
37
38
39
40
41
42
43
44
45
46
47
48
49
50
51
| package com.AndroidIncludeLayout;import android.app.Activity;import android.content.Intent;import android.os.Bundle;import android.view.View;import android.widget.Button;import android.widget.Toast;public class AndroidIncludeLayout extends Activity { /** Called when the activity is first created. */ @Override public void onCreate(Bundle savedInstanceState) { super.onCreate(savedInstanceState); setContentView(R.layout.main); View subLayout1 = (View)findViewById(R.id.main1); View subLayout2 = (View)findViewById(R.id.main2); Button myButton_main1 = (Button)subLayout1.findViewById(R.id.mybutton); Button myButton_main2 = (Button)subLayout2.findViewById(R.id.mybutton); Button startAnotherActivity = (Button)findViewById(R.id.startanotheractivity); startAnotherActivity.setOnClickListener(new Button.OnClickListener(){ @Override public void onClick(View arg0) { // TODO Auto-generated method stub Intent intent = new Intent(); intent.setClass(AndroidIncludeLayout.this, AnotherActivity.class); startActivity(intent); }}); myButton_main1.setOnClickListener(new Button.OnClickListener(){ @Override public void onClick(View arg0) { // TODO Auto-generated method stub Toast.makeText(AndroidIncludeLayout.this, "Button 1 Pressed", Toast.LENGTH_LONG).show(); }}); myButton_main2.setOnClickListener(new Button.OnClickListener(){ @Override public void onClick(View arg0) { // TODO Auto-generated method stub Toast.makeText(AndroidIncludeLayout.this, "Button 2 Pressed", Toast.LENGTH_LONG).show(); }}); }} |
同樣, 在另一個佈局亦可以重複使用相同的元素.

anotherlayout.xml
1
2
3
4
5
6
7
8
9
10
11
12
13
14
15
| <?xml version="1.0" encoding="utf-8"?> android:orientation="vertical" android:layout_width="fill_parent" android:layout_height="fill_parent" ><TextView android:layout_width="fill_parent" android:layout_height="wrap_content" android:text="The Another Activity" /><include android:id="@+id/main3" layout="@layout/sublayout" /></LinearLayout> |
AnotherActivity.java
1
2
3
4
5
6
7
8
9
10
11
12
13
14
15
16
17
18
19
20
21
22
23
24
25
26
27
28
29
30
| package com.AndroidIncludeLayout;import android.app.Activity;import android.os.Bundle;import android.view.View;import android.widget.Button;import android.widget.Toast;public class AnotherActivity extends Activity { @Override protected void onCreate(Bundle savedInstanceState) { // TODO Auto-generated method stub super.onCreate(savedInstanceState); setContentView(R.layout.anotherlayout); View AnotherSubLayout = (View)findViewById(R.id.main3); Button myButton_main3 = (Button)AnotherSubLayout.findViewById(R.id.mybutton); myButton_main3.setOnClickListener(new Button.OnClickListener(){ @Override public void onClick(View arg0) { // TODO Auto-generated method stub Toast.makeText(AnotherActivity.this, "Button 3 Pressed", Toast.LENGTH_LONG).show(); }}); }} |
記得, 如果你想運行此應用程序, 需要修改AndroidManifest.xml添加AnotherActivity活動(Activity).
沒有留言:
張貼留言